Molar Uprighting techniques
- Get link
- X
- Other Apps
if you are intersted in this article please follow for more readings
https://myorthodonticsblogg.blogspot.com/ 👈🏻
Mandibular molar uprighting using orthodontic miniscrew :
➢ Miniscrews main advantage is their ability to move specific teeth or even the entire quadrants directly, without involving other teeth or using inter-arch mechanics.
➢ Thus, they eliminate the reaction forces usually applied on the anchor teeth, leading to unwanted tooth movement and anchorage loss.
➢ Patients are also more satisfied with the more invisible treatment compared
to conventional methods .
(fig.1)
Uprighting of LL7 with a miniscrew and elastomeric chain(fig.1)
a)A miniscrew positioned in the retromolar area with an elastomeric chain between the screwand the molar; uncontrolled tipping.
b)Initial radiograph at the area of LL7.
c) Final radiograph after the uprighting of LL7, with the miniscrew placed distally and an
implant in the site of LL6.
d) Occlusal view of uprighted LL7
(fig.2)
Uprighting of LL7 with a miniscrew implant and a
cantilever:(fig.2)
a) A miniscrew is placed in the retromolar area, and a
small cantilever of
beta-titanium wire is inserted in a small buccal tube on the labial surface of LL7.
The yellow and green arrows represent the force system on both the tooth and
the TAD.
b) Uprighting of the molar with a cantilever connected
from the tooth to the screw distal to the molar.
c) Occlusal view of LL7 at the beginning of uprighting.
d) Lateral view of LL7 at the beginning stage.
e)
Lateral view of LL7 at the end of uprighting
(fig.3)
Preprosthetic uprighting of LL7 with a miniscrew and an uprighting spring(fig3):
a) Activation of the uprighting spring with a mesial
eccentric V-bend.
b,
c) A mini-implant with an incorporated bracket abutment placed in the alveolar
ridge as an attachment of the uprighting
spring.
d,
e)After 5 months of molar-uprighting treatment, no extrusion has taken place
(fig.4)
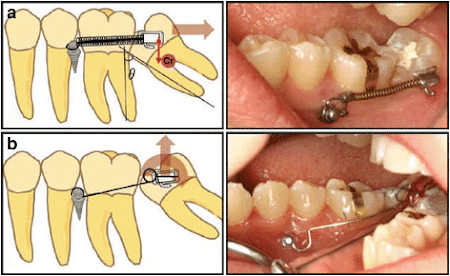
Uprighting of a mesially inclined LL7 with a miniscrew and a G-chain (fig.4) :
a) Patient with missing lower first molar and mesially
inclined lower left second molar before treatment.
b) A ligature
wire connecting the segments of the elastic chain.
c) G-chain tied
to miniscrew with ligature wire and activated by attaching free ends of chain
segments to bonded buttons.
d) Clinical situation after 5 months of traction
(fig.5)
Uprighting mesially impacted mandibular molars with 2 miniscrews(fig.5):
1) 0.017
3 0.025-in beta-titanium alloy wire with loops engaged with miniscrews;
2) Uprighting
completed after 9 months;
3)
cast photographs to show the relationships between the mandibular second molars
and their opposing teeth.
Molar Uprighting using a Simplified Technique (MUST) (fig.6):
1)The
basic technique: wire spanning the single tube on the first molar and the
double tube is bonded to the tipped molar.
2)
Flexible arch wire inserted into
the double tubes of both molars.
3)
The main arch wire occupies the
main tube of the first molar, while a flexible arch wire spans the auxiliary
tube of the first molar and the double tubes of the tipped molar.
Hybrid Removable Essix Appliance for Molar Uprighting (fig.7) :
1)A
0.040-inch (l mm) sheet of Essix type
2) An
expansion screws
3) fulltime
except during cleaning and eating and instructed to activate screw a quarter of
a turn once every week (a quarter turn proximates 0.1 mm according to
manufacturer's instructions)
References :
Magkavali-Trikka et al. Progress in
Orthodontics (2018) 19:1 DOI
10.1186/s40510-017-0200-2
Mansour E,
Kodaih A, El-Beialy AR, Mostafa YA. Molar uprighting using a simplified
technique (MUST). EJCO 2015 doi:10.12889/2015_C00242
International Journal of Dental
Sciences and Research. 2018, 6(4), 95-99. DOI: 10.12691/ijdsr-6-4-4 Published
online: June 01, 2018
- Get link
- X
- Other Apps
Comments


It’s really great information for becoming a better Blogger. Keep sharing, Thanks. For more details to visit root canal in Nagpur
ReplyDeleteThe Best Ayurvedic Sexologist in gurgaon for male sexual diseases, Dr. Inderjeet singh gautam has steered thousands of patients towards a healthier path for over 25 years
ReplyDelete